Thursday, December 8, 2011

Apktool - What it is and how to use it (Windows)

Windows APKTool
The Apktool is probably my best friend in the Android development world. Its purpose is very simple, it decodes an APK file back to its original form, then rebuilds it after modifcations have been made to smali code or XMLs. 
As taken from the google source code web site (brut.alll): "It is NOT intended for piracy and other non-legal uses. It could be used for localizing, adding some features or support for custom platforms and other GOOD purposes. Just try to be fair with authors of an app, that you use and probably like."
Some good uses of apktool are things like changing or removing options from the settings menu, etc, but it really can enable you to do almost anything to the OS, with the creativity and knowledge.

How to use it!
Before you begin, it's a good idea to have the following installed and set up:  JDK & JRE from HERE


Decompiling with APKTOOL - step by step:

1. You can either visit the google code site for apktool and read through their instructions, or use our pre-packaged APKTOOL.rar available here.
2. Extract the contents to a file you will remember, as you will be working from there in command prompt! I'd recommend putting it with your platform-tools if you haven't added them to your path, as this will make editing recently pulled applications easier.
3. Now, if the apk you want to edit is on your phone, use adb to pull it. If you're unsure of how to do this, go back to our beginner guides and read up on adb and the SDK.
4. Pull framework-res.apk from the phone, as some applications will require this to be decoded.
5. Once framework-res.apk has been pulled, type the following command:
apktool if framework-res.apk
To break that down, you're telling apktool to if (install framework) and then specifying the apk. You should see the following output:
I: Framework installed to C:\whatever\your\path\is\framework\1.apk
Now it's time to decompile the APK. 
6. Type the following:
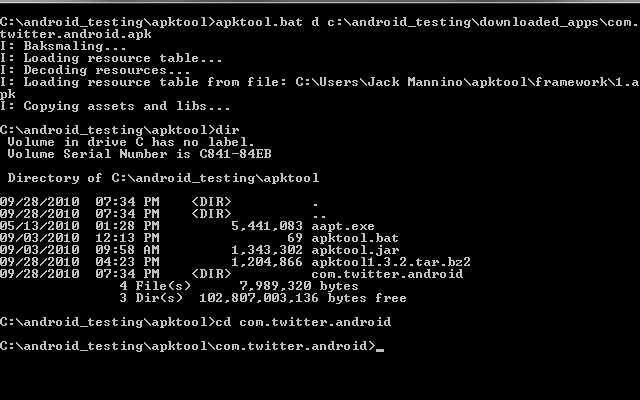
apktool d Settings.apk Settings
Of course, replace Settings.apk with the name of the application you want to decompile. To give you more of an explanation, you're telling apktool to d(decompile/decode) Settings.apk, and put the output in a folder called Settings. The folder part, Settings isn't necessary, I just included it so you could see that it was an option. 
You should then see the following outputs if its working:
I: Loading resource table...
I: Decoding resources...
I: Copying assets and libs...
Voila... your decompiled application will now be sat in the folder you specified above (we specified Settings). 

Rebuilding the APK after making modifications - step by step

1. Simply type the following command:
apktool b Settings Settings-new.apk
To break that down, you're telling apktool to b (build) the contents of the Settings folder into an apk called Settings-new.apk
You should see output similar to this:
I: Checking whether sources has changed…
I: Smaling…
I: Checking whether resources has changed…
I: Building resources…
I: Building apk file…
2. Once done, you will NOT be using the apk file you have just created. The reason being, for one it's not signed. Two... it often causes me problems. Instead, you need to open both the original Settings.apk and Settings-new.apk in 7-zip, and copy over the files you have changed from the NEW one to the ORIGINAL. If you have modified /res/values/*.xml, it's likely that these have been compiled into a file called resources.arsc. If that is the case, copy resources.arsc only. 
3. That's it! Add the new file to your ROM or push it back to the phone!

Android Market Celebrates 10 Billion Downloads With 10-Cent App Sale

Guess what? Your favorite Android app may be just 10 cents right now, thanks to the Android Market’s 10 billion downloads celebration.
Google announced the milestone on its blog:
“This past weekend, thanks to Android users around the world, Android Market exceeded 10 billion app downloads—with a growth rate of one billion app downloads per month. We can’t wait to see where this accelerating growth takes us in 2012.”
Ten-cent apps started popping up Monday afternoon, reports Android Central. It’s not all apps–just a select few super-popular ones. The promo will reportedly run for 10 days, with 10 ten-cent apps per day.
Here’s what’s $0.10 today:
SoundHound (normally $4.99)
SwiftKey X Keyboard (normally $4.06)
Sketchbook Mobile (normally $0.99)
Paper Camera (normally $1.99)
Asphalt 6: Adrenaline HD (normally $4.99)
Endomondo Sports Tracker Pro (normally $4.00)
Fieldrunners HD (normally $2.99)
Minecraft – Pocket Edition (normally $6.99)
Great Little War Game (normally $2.99)
Color Draw for kids:phone
So head on over to the Android Market–you can get all of these apps for just $1.00. The Apple App Store hit 10 billion downloads in March, and Apple celebrated by handing out a $10,000 iTunes gift card.

Dell abandons Android tablet computers in the USSAN

Posted on December 7, 2011, Wednesday
FRANCISCO: Dell said it would halt sales of its Android tablet computer in the US market, as rival Amazon’s new Kindle Fire had heated up in a market dominated by Apple’s iPad.
A message on the Texas-based computer’s website said that the seven-inch Streak tablet powered by Google’s mobile operating software would no longer be sold in the United States.
“Dell remains committed to the mobility market and continues to sell products here and in other parts of the world,” the company said in an email response to an AFP inquiry.
“We remain committed to expanding our reach beyond PCs (personal computers) with a targeted set of open, standards-based mobility solutions and services designed for commercial and mobile professional customers,” it added.
The Streak 7 failed to gain momentum after its debut at the Consumer Electronics Show in January.
The tablets were priced at US$200 as long as buyers signed contracts with telecom service provider T-Mobile.
Online retail powerhouse Amazon.com had meanwhile reported that its new Kindle Fire tablet was its best-selling product during the Black Friday shopping rush the day after Thanksgiving.
Fire had a seven-inch screen and is priced at US$199, believed to be slightly less than what it cost to make the tablets.
Fire also synchs with the growing trove of digital entertainment content available at Amazon.
Dell said Streak 7 continued to be available “in many markets” through partners such as Optus in Australia.

No Android market access in China


“I’m thrilled to see the entrance of MIPS-based Android 4.0 tablets into the market. Low cost, high performance tablets are a big win for mobile consumers and a strong illustration of how Android’s openness drives innovation and competition for the benefit of consumers around the world,” said Andy Rubin, senior vice president of mobile at Google in a statement.
The tablet has acquired Google certification to run applications such as Google Maps, Gmail, Google Music and Google Talk. However, Google does not provide official Android market access in China, so the device lacks that feature, said Jen Bernier-Santarini, a MIPS spokeswoman. Access to Android Market is an ongoing concern for inexpensive tablet users.
“Android Market access is provided by Google through negotiations with carriers and OEMs as part of Google Mobile Services in other geographies. So Google will need to work with US OEMs on this for future releases of the product,” Bernier-Santarini said.
However, the tablet can access other third-party app markets such as Amazon, from where apps like Angry Birds can be downloaded.

First Android 4.0, Ice Cream Sandwich tablet lands for $99

There is no shortage of cheap Android tablets from Chinese manufacturers that can be found for under $200 online, most of which are running an older version of Android and don’t have Google’s blessing (meaning no Google services and Market). MIPS Technologies and Ingenic Semiconductor announced today availability of the world’s first Ice Cream Sandwich, Android 4.0-powered tablet, and it just so happens to a $99 budget-friendly tab with decent specs.
The tablet will pack in a 1GHz MIPS-based ‘XBurst” CPU, 7-inch capacitive touchscreen, microSD, HDMI 1.3, WiFi 802.11 b/g/n, USB 2.0, 2-megapixel main cam, front-facing cam, and bluetooth. Ainovo, the company offering up the tablet to the Chinese market, is promising 30 hours standby and 8 hours video playback for battery.
The Novo7 will become available to the US market (likely with different branding) through other companies including OMG Electronics Ltd. and Leader International Inc. at a later date. There will also be 8 and 9-inch variants released in the future, mostly likely depending on the success of the 7-inch model. You might have to pay a little more than the US $99 price tag to get it shipped from a Chinese supplier before it lands stateside, but it will probably be your first chance to get your hands on an ICS tablet if you do.

making USB bootable for Windows special

Microsoft Provides a tool to do this for you – Windows 7 USB/DVD Download Tool which is available for Download here

Required:

  • USB Flash Drive (4GB+)
  • Microsoft OS Disk (Vista / Windows 7)
  • A computer running Vista / Windows 7

Step 1: Format the Drive
The steps here are to use the command line to format the disk properly using the diskpart utility. [Be warned: this will erase everything on your drive. Be careful.]

  1. Plug in your USB Flash Drive
  2. Open a command prompt as administrator (Right click on Start > All Programs > Accessories > Command Prompt and select “Run as administrator”
  3. Find the drive number of your USB Drive by typing the following into the Command Prompt window:
    diskpart
    list disk
    The number of your USB drive will listed. You’ll need this for the next step.  I’ll assume that the USB flash drive is disk 1.
  4. Format the drive by typing the next instructions into the same window. Replace the number “1” with the number of your disk below.
    select disk 1
    clean
    create partition primary
    select partition 1
    active
    format fs=NTFS
    assign
    exit
    When that is done you’ll have a formatted USB flash drive ready to be made bootable.

Step 2: Make the Drive Bootable
Next we’ll use the bootsect utility that comes on the Vista or Windows 7 disk to make the flash drive bootable.  In the same command window that you were using in Step 1:

  1. Insert your Windows Vista / 7 DVD into your drive.
  2. Change directory to the DVD’s boot directory where bootsect lives:
    d:
    cd d:\boot
  3. Use bootsect to set the USB as a bootable NTFS drive prepared for a Vista/7 image. I’m assuming that your USB flash drive has been labeled disk G:\ by the computer:
    bootsect /nt60 g:
  4. You can now close the command prompt window, we’re done here.

Step 3: Copy the installation DVD to the USB drive
The easiest way is to use Windows explorer to copy all of the files on your DVD on to the formatted flash drive.  After you’ve copied all of the files the disk you are ready to go.
Step 4: Set your BIOS to boot from USB
This is where you’re on your own since every computer is different. Most BIOS’s allow you to hit a key at boot and select a boot option

Saturday, December 3, 2011

Metallica – Six Feet Down Under Pt. 2 (2010)


Artist: Metallica

Album: Six Feet Down Under Pt. 2

Released: 2010

Style: Thrash Metal

Format: MP3 211Kbps

Size: 89 Mb


Tracklist:
01 – Blackened
02 – Ride The Lightning
03 – The Four Horsemen
04 – Welcome Home (Sanitarium)
05 – Master Of Puppets
06 – …And Justice For All
07 – Fade To Black
08 – Damage, Inc.

Friday, December 2, 2011

Metallica – Six Feet Down Under (2010) pr1

Artist: Metallica

Album: Six Feet Down Under

Released: 2010

Style: Thrash Metal

Format: MP3 187Kbps

Size: 62 Mb


Tracklist:
01 – Eye Of The Beholder – Recorded Live On May 4, 1989 At Festival Hall In Melbourne
02 – .And Justice For All – Recorded Live On May 4, 1989 At Festival Hall In Melbourne
03 – Through The Never – Recorded Live On April 8, 1993 At The Entertainment Centre In Perth
04 – The Unforgiven – Recorded Live On April 4, 1993 At The National Tennis Centre In Melbourne
05 – Low Man’s Lyric (Acoustic) – Recorded Live On April 11, 1998 At The Entertainment Centre In Perth
06 – Devil’s Dance – Recorded Live On April 12, 1998 At The Entertainment Centre In Perth
07 – Frantic – Recorded Live On January 21, 2004 At The Entertainment Centre In Sydney
08 – Fight Fire With Fire – Recorded Live On January 19, 2004 At The Entertainment Centre In Brisbane

Run Backtrack in window