Tuesday, July 31, 2012

Best way to have Nepali or Hindi font in your andorid.

a)  First your android must be rooted.
b)  You have to download Root file explorer from Play Store.
c) Download the required font in this link. (361kb)
d)  Copy this downloaded font to /system/fonts in sdcard from root file explorer.
e)  Restart your phone. Change is found,
f)  To type Nepali , You can download Multiling Language Keyboard from Play store,
g)  Happy Nepali browsing and Typing.

Setting up MySQL on Cloudfoundry Building a Native (kind of) Android App using Grails, HTML 5, CSS, Javescript hosted on CloudFoundry Integrating AdMob in your Android App and make money

As an android developer, I write android apps and publish them on the market mostly for free as I try to build a reputation :) . But, wouldn’t it be great if I could offer my app for free at the same time make some $$ through “Advertisement”? In this post I will go through integrating AdMob in an android application and start making some money (at least few cents ;) ).
If you want to learn more about AdMob, please visit their website http://www.admob.com/

Let’s get started:
Step 1: Registering with AdMob
First of all you need to register yourself with AdMob. You can do this by simply clicking on “Register” Link when you visit “www.admob.com”.
You can find more info about registration in http://developer.admob.com/wiki/PublisherSetup
Step 2: Setting up AdMob with your App
Once you are registred, login to the site and follow link to http://www.admob.com/appdevs You can get here by clicking on “Android” Icon on the homepage. (At the time of this writing AdMob website has an icon in the center of the page that features, iPhone, Android etc, I assume that link above should still work.)
i. Click on “Get Started” and then click on “Sites & Apps”. You can follow the link http://www.admob.com/my_sites/
ii. Click on “Add Site/App” button, this should take you to a setup wizard. In this example we will be working on an android app. Click on “Android App”
iii. Provide the Details. Put your app name under “App Name” (In this example I used “Demo”), As this is a new app and we haven’t published the app yet, you can put your website in the “Android Package URL”. (This is a required filed, so you have have something here). Select a category and add description and click “Continue”.
iv. Thats it you have successfully set up your “App” on AdMob. (You will see a page from where you should be able to download the admob library, if you do this now, you can skip Step 3 below.)

Step 3: Getting the AdMob library jar
If you did not download the jar that you saw at the end of Step 2. You can still get there by navigating to http://www.admob.com/my_sites/ You should see the app you registered in Step 2.  If you hover over the app name, you should see “Manage Settings”, Click on that. This should land you to a page from where you can get the library by clicking on “Get Publisher Code”.

Step 4: Setting up an Android App
 Let’s create an Android a Demo app. You can do this by going into Eclipse or any IDE with Android SDK and creating a new project.

Step 5: Adding the Library:
Once you have the android project set up create a directory called “libs”, and add the jar file you downloaded in step 3.
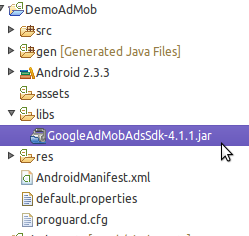
Now, go to the project properties by right clicking on the project name and clicking on “Properties”.  Go to “Java Build Path”, then on the right side, click on “Libraries” tab.
To add the jar, click on “Add JARs…” button and locate the Jar file in the libs folder in your project.

Step 6: Setting up a view
Since you added the lib and if you do not see any project problems you are all set. Now this should allow us to use a “AdView” in your android app. This is the view where AdMob will place a HTML5 advertisement.
There are two ways we can add this view, 1. in the Activity java code or 2. in the Layout XML. For Simplicity, lets do the XML one.
If you have the project set up lets go to the main layout of the app found in “res>layout” directory in your project. Locate “main.xml”.
In the XML, Lets Copy Paste the following XML in your layout.
1<com.google.ads.AdView android:id="@+id/adView"
2                         android:layout_width="wrap_content"
3                         android:layout_height="wrap_content"
4                         ads:adUnitId="YOUR_PUBLISHER_ID HERE"
5                         ads:adSize="BANNER"
6                         ads:loadAdOnCreate="true"/>
Replace “YOUR_PUBLISHER_ID HERE”, with id you got while in Step 3.
Also, Include following namespace code int he Layout tag.
So your final code should look something like this
01<?xml version="1.0" encoding="utf-8"?>
02<LinearLayout xmlns:android="http://schemas.android.com/apk/res/android"
04    android:orientation="vertical"
05    android:layout_width="fill_parent"
06    android:layout_height="fill_parent"
07    >
08<TextView
09    android:layout_width="fill_parent"
10    android:layout_height="wrap_content"
11    android:text="@string/hello"
12    />
13    <com.google.ads.AdView android:id="@+id/adView"
14                         android:layout_width="wrap_content"
15                         android:layout_height="wrap_content"
16                         ads:adUnitId="a14e2f8fe3af5a6"
17                         ads:adSize="BANNER"
18                         ads:loadAdOnCreate="true"/>
19</LinearLayout>
Step 7: Setting the Manifest
AdMob requires internet and network access, so it can pull down the ad to display on your app. So, Lets update the AndroidManifest.xml.
Edit the AndroidManifest.xml file found in your project. Add Following Activity right below the current activity.
1<activity android:name="com.google.ads.AdActivity"
2          android:configChanges="keyboard|keyboardHidden|orientation"/>
And Now, add following permissions
1<uses-permission android:name="android.permission.INTERNET"/>
2    <uses-permission android:name="android.permission.ACCESS_NETWORK_STATE"/>
Your Manifest should look something like:
01<?xml version="1.0" encoding="utf-8"?>
02<manifest xmlns:android="http://schemas.android.com/apk/res/android"
03      package="com.novaapps.android.couponmanager"
04      android:versionCode="1"
05      android:versionName="1.0">
06 
07    <application android:icon="@drawable/icon" android:label="@string/app_name">
08        <activity android:name=".CouponManager"
09                  android:label="@string/app_name">
10            <intent-filter>
11                <action android:name="android.intent.action.MAIN" />
12                <category android:name="android.intent.category.LAUNCHER" />
13            </intent-filter>
14        </activity>
15 
16    <activity android:name="com.google.ads.AdActivity"
17              android:configChanges="keyboard|keyboardHidden|orientation"/>
18 
19    </application>
20 
21    <uses-permission android:name="android.permission.INTERNET"/>
22    <uses-permission android:name="android.permission.ACCESS_NETWORK_STATE"/>
23 
24</manifest>
Step 8: Done!
That’s it, now you can run your demo app and see the admob advertisement show up in your app!
(Note: It may take a while for the app to appear on the screen as it is being set up for the very first time, it should be faster in subsequent loads)

You can learn more Here:
http://code.google.com/mobile/ads/docs/android/fundamentals.html

 thank you Manij_Shrestha . copied from this link

another way to Install Nepali/Devnagari font on Android devices

here is yet another way that should work for most of the devices. Please feel free to comment and thank if this works for you.
Steps on Installing Nepali Font:
1. Rooted Device: Your device must be rooted prior to being able to perform these steps. Rooting steps varies based on the device/manufacturer etc. So your best bet is to google search steps on rooting your device.
Note: The reason we need rooted device is to obtain super user access. You can tell if your device is rooted by locating “Superuser” app. Icon should look similar to one below.

2. Installing Terminal Emulator: You will need the “Android Terminal Emulator” app. You can find this app on the Android Market.
3. Installing BusyBox: You will also need to install “BusyBox” app. You can also find this app on the Android Market as well.
After you have installed the BusyBox, open the app to complete the installation. You may see a screen like below:

Now you have all the tools you needed, lets get rolling.
4. Download the font: You will need to download the following font on your device. If you do not want to use a computer, just open this site on your android device and simply click on the following link. (it should download the font in /mnt/sdcard/download/DroidSansFallback.ttf)
DroidSansFallback.ttf
5. Terminal Emulator: Now after you have downloaded the font, simply open the Terminal Emulator app that you had installed in step 2 above.
You should see following screen:

Now following steps are important. Pay attention to the details here.
in the Emulator screen simply type “su” and press enter.
1$ su
2 
3#
You will notice a pop-up asking for super user access. Simply click “Allow”. If might be prompted for this access multiple times, just click “Allow”.

You will notice that your prompt changed from “$” to a “#”.
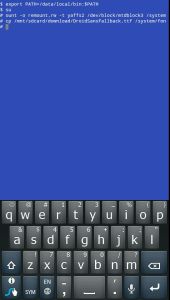
Now, simply type the following command in the terminal and hit enter. If you have this open in a browser in the device you can simply copy and paste it from here as well.
1mount -o remount,rw -t yaffs2 /dev/block/mtdblock3 /system

If everything went fine you should see “#” prompt right after that.
If you had downloaded the font from this post within your device simply copy paste or type the following command and hit enter in the emulator.
1<code>cp /mnt/sdcard/download/DroidSansFallback.ttf /system/fonts</code>
Your screen might look similar to one below:

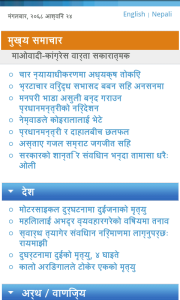
Thats it!, If everything went fine then you should now be able to see Nepali font without any issues.
Before and After Screen shots:

Installing Nepali/Devnagari Font in Android

One of the issues with Android is that it doesn’t come with Nepali / Devanagari font by default. When I visit websites with Nepali font or have posting on Facebook with Nepali text, it shows up as boxes. Similar to image below.

It started to be more annoying as I would get emails in Nepali font, and I would have to check it on a computer.
So after tinkering around, I am happy to report that I have a solution.
This is how I solved it:
Download the Font (DroidSansFallback.ttf) on your SDCard:
DroidSansFallback.ttf
Using ADB (You may be able to use some “Explorer app” with root access. adb is simple if you have Android SDK installed)
go to the device console:
1$ ./adb shell
2#
Mount your phone drive so you can have write access to system folder
1# mount -o remount,rw -t yaffs2 /dev/block/mtdblock3 /system
Now, Simply copy over the font from your sdcard to “/system/fonts”.
(font might be already existing on the device, you can just overwrite it.)
1# cp /mnt/sdcard/DroidSansFallback.ttf /system/fonts
(Note: DroidSansFallback.ttf is stored on the root of the sdcard.)
Thats it, now reboot your device and your device should render Nepali font with no issues :)

Hope this helps!

Decompiling an Android apk file to view the underlying code

Few weeks ago, I saw a question posted on linkedin Android group, asking if we can view the application code of a complied apk file. There were interesting responses stating it is possible. Today I am putting it all together in this post about how you can do just that.
1. Obtaining the “apk” file: There are many ways that you can obtain the apk file. You can probably find it on the Internet. Or the best way is to get it from your phone. In this example, we will tear apart facebook android app :)
The apk file of the application that is purchased from the android market is stored in ‘/data/app’ folder on your phone. To access this directory, you need super-user access.  If your phone is rooted, follow the steps below to obtain the apk file if not, you might be able to get one from the Internet.
1$ ./adb shell
2$  su
3#  cd  /data/app
4# ls com.facebook*
5# com.facebook.katana-2.apk
6# cp com.facebook.katana-2.apk /sdcard
7#

Copy over the apk file on to your computer from the sdcard.
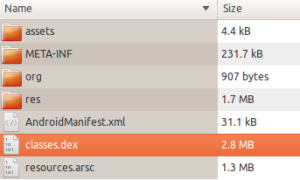
2. Obtaining the “.dex” file: Open the downloaded apk file as a zip file. You can use “Archive Manger” on linux or “WinZip” on windows. You can also change the file extension to “.zip” and have the OS automatically open it as a zip file.
In there, you should see “classes.dex” file. This is the byte code of the complied application. Extract the file on to your computer.

3. Dex2Jar tool: You need dex2jar tool to decode the dex file to a jar file. The dex file is the Dalvik executable file. You can get the latest and greatest version at
http://code.google.com/p/dex2jar/downloads/list.
Download and install the application in your computer. I extracted it out on my android installation folder.
Once you have it run the “dex2jar” command to decompile the “.dex” file extracted in step 2.
You can run the following command on linux, on windows you can run the “dex2jar.bat” instead of “dex2jar.sh”
1$ ./dex2jar.sh classes.dex
You should see an output as follows.

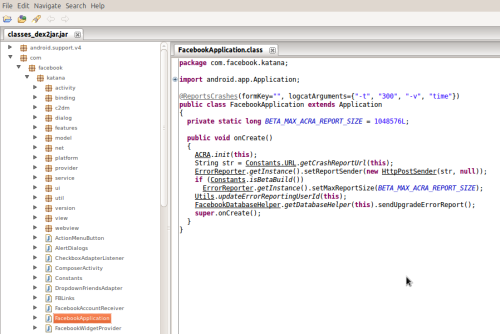
4. Decompiling the jar: You can now open the decoded “.jar” file from step 3 on a java decompiler of your choice.
There are few out there. I choose JD-GUI. You can download one from their site at: http://java.decompiler.free.fr/?q=jdgui
Install the tool and open the jar extracted on step 3. Boom now you can see the application code!

Monday, July 30, 2012

DIY: Make an App without Coding – AppInventor

Hello guys,
Today we are going to review a very intuitive and user friendly android App development tool by Google. Have you ever imaging that you want to be developer and having not programming skills? Google has made your life easier if you really want to learn and develop android App. This tool allows you to develop an App just by drag and drop. It doesn’t require any programming skills except some technical knowledge of android. This tool is called “AppInventor”. This App is completely dedicated to beginners and intermediate skilled people. If you  have very customized requirement then you should be expert developer and able to write codes. Because AppInventor doesn’t offer you many functions. It has some limitations too.
To setup AppInventor in your PC follow this link: http://www.appinventorbeta.com/learn/setup/

Once you setup, you will be redirected to the following window as shown in below. (Note: this is browser based window only, means you will design your app in browserand in your google accout where it will be saved as project.)

How to root your Samsung Device

comments
How to root your Samsung Device Hey all!
Bellow there is a easy and fastway to root your samsung device
Theoretically speaking this tutorial will work on any device, but its focused on Samsung devices
It should work in almost all Samsung android devices
First of all download the required file
You might need to install the USB Drivers for this, you can try by using the Drivers Installation (Located inside the zip file) or you can download Samsung Kies that contains the USB Drivers
You will also need to activate the Debugging on your Device, its easy
Open the setting menu, select the applications and the Development
Activate the USB Debugging and wait for the drivers to be installed (check photos bellow)
Applications
Applications

Development
Development

Debugging
Debugging

Wait for the drivers to install
Ok, good
Extract the zip file and open the folder
Double click the “root”  and wait for the procedure
Done!
TIPS:
Inside the zip there is also some other programs
- shell : access the root shell of the device
- logcat: debug the device
- recovery: reboot into the recovery of the device
Enjoy!

CyanogenMod Installation Guide for Galaxy 5

111 comments CyanogenMod Installation Guide for Galaxy 5
Hey Guys,
This is Guide to flash CyanogenMod 7/9 on your Galaxy5 via MAD Team’s new ROM Manager app – MAD Manager. You need to flash ClockworkMod Recovery first, before you can flash any Custom ROMs on your device.
What is ClockworkMod?:
ClockworkMod – also known as Clockwork and CWM – is a custom recovery for Android phones and tablets that allows you to perform several advanced recovery, restoration, installation and maintenance operations on your Android device that aren’t possible with the stock recovery.

Flashing ClockworkMod Recovery

- Method via MAD Manager
     Note: Your device must be rooted to flash ClockworkMod Recovery via this app
1.  Download and launch MAD Manager
2.  Select ClockworkMod Recovery from main menu.
3.  Now from the list, select the latest ClockworkMod Recovery and click Download.

4.  After the download complete, click Flash button.

5.  Now allow root access, it will flash recovery image on your Galaxy5.
- Method via ODIN
      You can also flash ClockworkMod Recovery via ODIN Multi Downloader.
1.  Download the latest tar release from this thread. Do not extract any files from the .tar file.
2.  Flash the .tar file via Odin using the regular “One Package” procedure. If you need help, consult the relevant wiki page.
3.  Your phone should now automatically reboot into ClockworkMod. Enjoy!
IMPORTANT:  flashing via the .tar method will convert your /cache partition back to RFS. Make sure to “wipe cache” after flashing via the .tar method when it reboots to recovery.

Downloading CyanogenMod

1. Launch MAD Manager.
2. Select Download ROMs from main menu.
3. Select CyanogenMod 9. Then select the latest version of this ROM.

4. Next, you will see Download Screen. Press Download button and wait until download starts.
5. CyanogenMod doesn’t contain Google Apps. You’ll need to download Google Apps package seperatley.
If you want to download ROM from PC you can download ROM from here: goo.im/devs/psyke83

Flashing CyanogenMod ROM

1. Select Flash Update from main menu.
2. Select first ‘update.zip‘ option and browse for CyanogenMod update zip package that you downloaded before.
3. Downloads will be found in /sdcard/madmanager/
4. Then do the same with Google Apps update package.

Note: Galaxy5 has small system partition. Since the system partition is full even with minimal Google Apps, don’t flash additional updates, unless you know what you are doing! Leave the third update.zip empty!

5. Select Backup ROM if you want to backup current ROM before flashing. Make sure you are backing up any Custom ROM not Stock ROM else it wont work. If you are running stock Samsung ROM don’t check Backup ROM option!

6. If you are upgrading from CM7, Froyo or Eclair, you will need to Wipe Data. Just tick the Wipe Data option. If you are selecting Wipe Data, then Dalvik cache will be wipe with it, so there is no need to select Wipe Dalvik cache, though, if you select it, app will ignore it while flashing.
7. Now select Flash update(s). Phone will reboot into recovery and flash updates automatically.
After flashing it will boot into new CyanogenMod 9 – Android 4.0 (Ice Cream Sandwich).
Have fun!
Thanks for reading!

[New Release] CyanogenMod 7.2.0-RC2 v2.4 for Galaxy5

91 comments [New Release] CyanogenMod 7.2.0-RC2 v2.4 for Galaxy5

Hey folks
psyke83 has released new updated version of CyanogenMod ROM for GALAXY 5 users. The new released version is CyanogenMod 7.2.0-RC2 V2.4
Download: update-cm-7-20120518-MADTEAM-galaxy5-signed.zip
Google Apps: 20110828

Installation instructions
Installation (updating from older CM7 build):
  • Open the GooManager application.
  • Select the Check for rom updates option.
  • Click on the notification for the available update and then click the Download button.
  • When the download finishes, enter recovery and install the update package followed by the Google Apps package.
Installation (first time/new users):
  • Open the GooManager application.
  • Navigate to psyke83 -> roms -> galaxy5.
  • Click on the build you wish to install from the list.
  • If needed, click the Download Gapps button to download the Google Apps package. The most recent (and most suitable) version will always be selected for you automatically.
  • Click on the Download button to download the rom.
  • Once the download(s) are complete, reboot into recovery and install the update package, followed by the Google Apps package.
  • Important: if you are updating from a stock or custom ROM, choose the data wipe option before rebooting.

    What’s new?
20120518 [v2.4]
  • Updated CyanogenMod source – version 7.2.0 RC2+ (pre-release).
  • Various improvements to libaudio: updated to Adriano Carrata’s rewritten libaudio code (with my Samsung customizations re-added), added user-adjustable audio attenuation (disabled by default – see post #2), implemented Samsung’s proprietary snd_set_extamp ioctl to improve audio quality, reduce in-call volume on headsets & fix FM radio background hiss.
  • Updated kernel with KSM (Kernel Samepage Merging) support – disabled by default, see madconfig documentation in post #2 for details.
  • Switched to wpa_supplicant v5 & awext driver. This fixes the issue in which wifi didn’t connect properly either on first boot, or when activated via the notification bar/widgets.
  • Switched to libjpeg-turbo for better performance in Gallery & other apps making intensive use of jpeg images.
  • Switched to CM7 version of libgralloc & libcopybit, updated libcamera source.
  • Added support for automatic ROM re-odexing to madconfig (recommended only for people not using an app2sd method).
  • Small change to fake dual-touch driver to slightly improve touchscreen edge sensitivity.
  • Added support for ROM downloads/OTA updates via MAD Manager. Note: GooManager is still supported – it’s your choice which application to use.For more detail about previous version go here

Share PC internet with G5 without WiFi

mments
Share PC internet with G5 without WiFi
Hello everyone,
Today we are going to cover our madteam member’s post. “sqdzn” has done great effort for making tutorial on Share Internet From Your PC via USB Cable without wifi connection.
This is really useful tutorial if you lacking of wifi connection at home or work and still want to use internet on G5 to download some apps, ROMs etc. This is possible. All you need is data cable and sqdzn guide. :)  Thanks to sqdzn for sharing this guide.
Follow steps as shown below.
- Make sure you were install your usb driver on yer PC.
(in this case, i use Window$ XP SP3 with Samsung KIES Installed)- put your G5 into PC using USB data cable.
then, straight to Settings > Wireless & Network settings > Thetering & Portable Hotspot.
- Back to the homescreen after check USB Thetering.
don’t forget to check that!- now, we move to your PC. 
open your Network Connections and see few pictures below.
- Do not forget to check that Internet Connection Sharing.- now, we get share icon on our prime connection now
move, to our second connections. (Samsung Android USB NDIS Remote).
- set the IP Address and Netmask. and ignore another.
Are we finish? not!
keep reading this. Scroll to down.
next, we need Termul ( Terminal Emulator) with root privilege.
open your Termul and type (execute each line with [enter] button.$su don’t forget to allow that :PNow, we gotta # symbol that means you we superuser on your termul.type:
#ifconfig usb0 192.168.0.2 netmask 255.255.255.0then,
#busybox route add default gw 192.168.0.1
ignore the picture, just for compliment  :Pnow, try to ping your fave site!wow, we got reply from server. that means you’re luck!
if not work? try again till you’re luck ;phappy fishing!
and DWYOR   8)    — sqdzn
I hope you have successfully followed this tutorial. I really appreciate sqdzn for sharing this tutorial with us.
If you have any comment and feedback please leave it below :)
Thank You
MayurV