here is yet another way that should work for most of the devices. Please feel free to comment and thank if this works for you.
Steps on Installing Nepali Font:
1. Rooted Device: Your device must be rooted prior to being able to perform these steps. Rooting steps varies based on the device/manufacturer etc. So your best bet is to google search steps on rooting your device.
Note: The reason we need rooted device is to obtain super user access. You can tell if your device is rooted by locating “Superuser” app. Icon should look similar to one below.

2. Installing Terminal Emulator: You will need the “Android Terminal Emulator” app. You can find this app on the Android Market.
3. Installing BusyBox: You will also need to install “BusyBox” app. You can also find this app on the Android Market as well.
After you have installed the BusyBox, open the app to complete the installation. You may see a screen like below:

Now you have all the tools you needed, lets get rolling.
4. Download the font: You will need to download the following font on your device. If you do not want to use a computer, just open this site on your android device and simply click on the following link. (it should download the font in
DroidSansFallback.ttf
5. Terminal Emulator: Now after you have downloaded the font, simply open the Terminal Emulator app that you had installed in step 2 above.
You should see following screen:

Now following steps are important. Pay attention to the details here.
in the Emulator screen simply type “su” and press enter.
You will notice a pop-up asking for super user access. Simply click
“Allow”. If might be prompted for this access multiple times, just click
“Allow”.

You will notice that your prompt changed from “$” to a “#”.
Now, simply type the following command in the terminal and hit enter. If you have this open in a browser in the device you can simply copy and paste it from here as well.

If everything went fine you should see “#” prompt right after that.
If you had downloaded the font from this post within your device simply copy paste or type the following command and hit enter in the emulator.
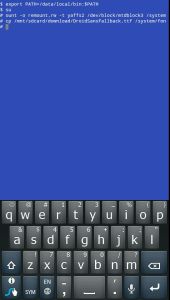
Your screen might look similar to one below:

Thats it!, If everything went fine then you should now be able to see Nepali font without any issues.
Before and After Screen shots:


Steps on Installing Nepali Font:
1. Rooted Device: Your device must be rooted prior to being able to perform these steps. Rooting steps varies based on the device/manufacturer etc. So your best bet is to google search steps on rooting your device.
Note: The reason we need rooted device is to obtain super user access. You can tell if your device is rooted by locating “Superuser” app. Icon should look similar to one below.

2. Installing Terminal Emulator: You will need the “Android Terminal Emulator” app. You can find this app on the Android Market.
3. Installing BusyBox: You will also need to install “BusyBox” app. You can also find this app on the Android Market as well.
After you have installed the BusyBox, open the app to complete the installation. You may see a screen like below:

Now you have all the tools you needed, lets get rolling.
4. Download the font: You will need to download the following font on your device. If you do not want to use a computer, just open this site on your android device and simply click on the following link. (it should download the font in
/mnt/sdcard/download/DroidSansFallback.ttf)DroidSansFallback.ttf
5. Terminal Emulator: Now after you have downloaded the font, simply open the Terminal Emulator app that you had installed in step 2 above.
You should see following screen:

Now following steps are important. Pay attention to the details here.
in the Emulator screen simply type “su” and press enter.
1 | $ su |
2 |
3 | # |

You will notice that your prompt changed from “$” to a “#”.
Now, simply type the following command in the terminal and hit enter. If you have this open in a browser in the device you can simply copy and paste it from here as well.
1 | mount -o remount,rw -t yaffs2 /dev/block/mtdblock3 /system |

If everything went fine you should see “#” prompt right after that.
If you had downloaded the font from this post within your device simply copy paste or type the following command and hit enter in the emulator.
1 | <code>cp /mnt/sdcard/download/DroidSansFallback.ttf /system/fonts</code> |

Thats it!, If everything went fine then you should now be able to see Nepali font without any issues.
Before and After Screen shots:


No comments:
Post a Comment
thank you